Welcome to the third part of our printer cartridge installation series! To recap, in the first installment of our series, we identified the differences between inkjet and toner, and offered a practical step-by-step guide on how to carry out the task. The second installment offered a comprehensive guide to changing HP printer cartridges. In this article, we’ll be talking about how to change Epson printer cartridges.
As with all manufacturers, no two Epson printer models are exactly the same. This means that each has a slightly different installation method. Older Epson printer models use two cartridges whereas the newer ones use four. This guide will provide instructions on how to replace ink on printers that use 4 cartridges. First, let’s get some Epson installation fundamentals checked off.
Basic Steps When Replacing an Epson Cartridge
#1 – Arrange your new cartridges in order
Make sure you take note of your Epson printer’s model number, cartridge. Once you’ve purchased your replacement cartridge and carefully removed it from its packing, you’ll see four cartridges – three coloured and one black.
Place each cartridge on a piece of paper (in case of leakage) and arrange them in the order you will be installing them into your Epson printer. Make sure all four pieces are laying face up so you can see their labels and arrange them in the following order:
-
- Cyan
-
- Magenta
-
- Yellow
- Black
#2 – Remove your Epson printer’s old cartridge
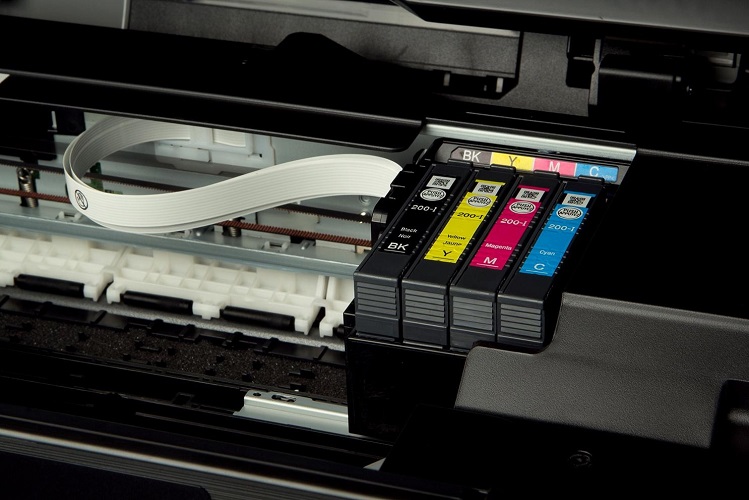
Next, make sure your printer is powered on and then lift the printer lid to expose the cartridge carriage. Carefully pull back the cartridge cover on its hinges so you can see the cartridges. Please note, the cartridge carriage often sits under a multi-colored strip.
Remove each individual cartridge from left to right by placing your index finger on each edge (one by one) and pulling them up until they’re released. Please ensure you dispose of the cartridges safely, check if there are local cartridge recycling centers nearby.
#3 – Insert your new cartridge into the printer
Before you proceed, if you have any concerns or doubts, we strongly advise that you consult your printer’s manual for specific installation instructions, as incorrectly inserting a cartridge can be very costly.
Before installing your new cartridges, remove the yellow tape from each section to expose the ink nozzles. Next, place each section into the cartridge carriage in the order detailed in step two (if in doubt, use the multicoloured strip above the carriage as a guide). To do this, place them into their respective slots face up and gently push down until they click in into place. Once they have all been inserted into the cartridge carriage, close the cartridge cover and securely close the printer lid.
#4 – Test your Epson cartridge
After you’ve successfully installed your ink cartridges, it’s time to carry out that all-important print test to check everything’s working the way it should. Fire up your desktop, cue up a document, press print, check the results and you’ll soon be able to see if the ink is printing correctly. Please note, if the ink comes out streaky or smudgy, consult your Epson printer manual to check how to realign the printer heads.
Now that we’ve been over the fundamentals of changing an Epson printer cartridge, we are going to focus on the installation instructions for two popular Epson printer models to highlight the differences in each of their cartridge replacement process.
Changing Epson Expression XP-430 Cartridges
This versatile printer operates on either a standard yield or high yield cartridge (Epson 288/288XL). Most consumers tend to prefer a high yield to a standard yield cartridge as it yields quite a bit more ink.
Here is a step-by-step guide on the cartridge installation process. You can also use the same instructions on other Epson printers that use 4 cartridges.
- If the cartridge is expended, you will see a Replace Ink Cartridges message on your ink screen. If this message pops up you can select Replace Now to begin the installation process. Should you want to replace the cartridges before the message pops up, simply press the Home button, hit the left arrow until you see the words Set-Up, and press OK.
- Next, click to the right to highlight Maintenance and select OK. Then, click the arrow to the right until you see the option Ink Cartridge Replacement, then press OK.
- Lift up the scanner, remembering to hoist up the whole unit and not just the scanner lid; this will expose all four ink cartridges. Once you have done this, the print head will move and stop at the right hand side of the unit.
- To remove each cartridge section, squeeze the tab on the end of the cartridge you want to remove and pull upwards. Please note, before moving any of the ink cartridges, make sure you make a note of how the colors are oriented in the machine. The order for the XP-430 is black, yellow, magenta, and cyan.
- Before removing the new cartridge from the sealed bag, shake it a couple of times to get the ink flowing. Carefully remove the cartridge from its packaging and remove the yellow tab on its end to reveal the vent hole. Press the tab down into the correct color slot, applying some pressure until it clicks into place (the tab end should go back towards the machine). Please note, if you are replacing a brand new genuine ink cartridge, make sure you do not touch the green and gold contact chip.
- Lower the scanner unit and press the Start button. Your printer will charge the ink; this will take a few moments.
- A message will appear to inform you it’s charging, please wait.
- Press OK to proceed and you will be ready to start printing.
Changing Non-OEM (Remanufactured) Epson T288 / T288XL Cartridges
If you are using an alternative aftermarket Epson 288 cartridge on your Epson XP-430 and getting a recognition error, try the following steps to resolve the issue. You can also follow these instructions when installing remanufactured Epson 200 (and 200XL) cartridges.
- Gently clean the gold and green contact chip with a lint free cloth, or Q-tip. Sometimes residue can get on the contact and cause a machine-based error. A compatible chip will look slightly different than a genuine chip, but it will not affect functionality.
- Try resetting the printer. To do this, carefully remove the cartridges from the printer, power the printer off and unplug the power cord for around 10 – 15 seconds.
- Plug the printer back in, power it back up and re-insert the cartridges.
Our remanufactured ink cartridges offer a specially-designed compatibility chip that will accurately measure ink levels; much like the Epson originals.
Troubleshooting any print quality issues:
If you’ve successfully installed your new cartridge and its not giving you the print quality you expect, you should try running your machine’s print head cleaning mechanism.
- To do this, press the Home button, then hit the left arrow until you see Setup and press OK.
- A message will pop up that states Ink Levels. Click to the right to highlight Maintenance and select OK.
- Next, press the arrow to select Head Cleaning and press OK. Press Start button to begin the head cleaning process. The power button will flash through the entire cleaning cycle and stay green when the cycle is finished.
- After it is complete, select Nozzle Check to confirm the print head is clean.
Changing Cartridges on Epson Workforce Printers
Epson Workforce printers run on standard, high yield, and for some printers, extra high yield, cartridges. Most consumers tend to prefer a higher yield cartridge to a standard yield cartridge, as they get more prints out of it.
Reminder: Before we begin, check the ink levels on your printer to ensure that your ink is indeed running low. Press the Setup button (which looks like a wrench), select Ink Levels, and press OK. A screen will pop up showing you the levels of each cartridge. Press the Copy button to exit the menu.
Here’s how to change ink cartridges on WorkForce printers. Use the same process when changing Epson WF-3640 and Epson WF-7620 cartridges.
- Should your ink be running low, a message will pop up on the LCD screen of your printer. If that message does appear, you should be able to select Replace Now on the screen. If you want to replace the cartridges before that message prompts you up press the Setup (wrench) button and select Maintenance.
- Next, click to the right to highlight Maintenance and select OK. Then, click the arrow to the right until you see the option Ink Cartridge Replacement, press OK.
- Lift up the scanner, remembering to hoist up the whole unit and not just the scanner lid; this will expose all four ink cartridges. Then, open the cartridge cover and squeeze the tab end of the cartridge you want to replace and pull up.
- To remove each cartridge section, squeeze the tab on the end of the cartridge you want to remove and pull upwards. Please note, before moving any of the ink cartridges, make sure you make a note of how the colors are oriented in the machine. The order for the Epson Workforce 545 is black, yellow, magenta and cyan.
- Before taking the new cartridge from the sealed bag, shake it a couple of times to get the ink flowing. Gently remove the cartridge from its packaging and remove the yellow tab on its end to reveal the vent hole.
- Press the tab down into the correct color slot, applying some pressure until it slots into place (the tab end should go back towards the printer). Please note, if you are replacing a brand new genuine ink cartridge, make sure you do not touch or handle the green and gold contact chip
- Close up the cartridge cover until it clicks into place, then lower the scanner unit. The printer will begin to charge the ink which usually takes about two or three minutes. When charging is complete, you will be ready to get printing!
For instructions on the cleaning and maintenance of Epson Workforce printer cartridges, please refer to the sections detailed in our Epson Expression XP-430, as the same principles apply – and if you have any more burning printer based questions, please feel free to get in touch.
We hope you enjoyed our comprehensive guide on how to change an Epson printer cartridge. Keep your eyes peeled for part four of our printer installation guide series which will talk about how to replace Canon cartridges.
Disclaimer: The images on this page are not owned by InkCartridges.com and are used solely as examples or to illustrate concepts discussed in the article. Please click on the images to see their original sources.