
In this fourth and final installment of our fool proof ink cartridge replacement guide series, we are going to talk about replacing printer cartridges in Canon printers.
Canon printers come in many shapes and sizes, which means no two models are exactly the same. There are a whole host of different printers included in the Canon range, including all-in-one inkjets, photo inkjets, laser printers and laser multifunction printers which are primarily manufactured to produce top class photographic prints.
Now, to cover two main ends of the Canon printer spectrum, we are going to focus on the installation instructions for replacing the Canon PIXMA MG2520 ink cartridge and the Canon PIXMA MX922 ink cartridge, two quite different but equally popular printer models. Let’s get started!
How to Replace a Canon PIXMA MG2520 Ink Cartridge
The Canon Pixma MG2520 is a sleek, versatile all-in-one with features such as HD movie print and efficient wireless performance. This particular printer houses two separate ink cartridges – one for black and one for color. Canon offers both cartridges in a high yield and standard yield option. The high yield is slightly more expensive but holds significantly more ink:
- PG-245XL Ink High-Yield Black (8278B001AA) / Page Yield: 300
- CL-246XL Ink High-Yield Color (8280B001AA) / Page Yield: 300
- PG-245 Ink Standard-Yield Black (8279B001AA) / Page Yield: 180
- CL-246 Ink Standard-Yield Color (8281B001AA) / Page Yield: 180
#1. Retract the output paper tray and extension
Assuming you’ve bought your replacement cartridges and you’ve identified the need to install them, first you’ll need to push in the paper tray at the front of the printer. Step one, remove any paper resting on the tray; step two, push it in gently with the palm of your hand until it’s flush with the rest of the printer unit (has disappeared).
#2. Open the cover
To expose your printer’s internal mechanism, you will need to open up the front cover, which is located just above the paper tray. Much like a drawer, this has a finger indent at the top, which you will need to push in (DO NOT pull it down as this may damage the unit). You’ll hear a click and the flap will come down, causing the ink cartridge holder to automatically move to the center of the printer.
#3. Remove your Canon printer’s old cartridges
To take out the old cartridges, use your thumb and index finger to gently pull them out of their slot. Do this with a steady hand and make sure you remove each cartridge one at a time.
#4. Insert the new Canon ink cartridges
First, you will need to remove each cartridge from their packaging and lay them flat on an even surface. Next, you will need to pull the plastic tab from each cartridges’ to expose their nozzles.
Once you have done this, you will need to insert each cartridge into their respective slot. To do this, make sure you insert them nozzle first and label up, with a firm push upwards until it clicks into place. Please note, the black ink goes into the right holder and the color ink goes into the left. Double check the cartridges are secure before closing the lid.
Once you have closed the lid, the printer’s ON light (located on the top left) will flash green for a minute or so before staying lit.
#5. Test your cartridges
During any printer ink cartridge installation, conducting a test print is vital.
Fire up your desktop, cue up a document, press print, take a look at the results and you’ll soon be able to see if the ink is printing the way it should. Please note, if the ink comes out streaky or smudgy, consult your Canon printer manual to check how to realign the printer heads.
Should the triangular warning emblem (located on the top left) flash orange, re-open your printer and check the cartridges are installed correctly, by giving them a push.
How to Change a Remanufactured Canon Cartridge:

The installation process of a remanufactured cartridge is the same as installing an original Canon, but you might run into a small hiccup along the way. Many remanufactured versions of the PG-245 and CL-246 series do not recognize in your printer like a genuine product would. Fear not, the cartridges do still work but it does take a little bit of tinkering to get them up and running. If you buy a remanufactured cartridge and you get an error message upon installation, follow these easy steps to get back in business!
-
- You might see an error message saying your recently installed cartridge is “low” or “empty”. This of course is not true, you should have a perfectly good, fully functioning cartridge in your hands! The printer is still reading the information on the chip from the last time the cartridge was in use. Since then it has been refurbished and refilled with ink, but the chip has not been replaced. To get the cartridge working you need to force the machine to override that error message and accept the cartridge as is.
-
- The first thing you are going to want to do is take the cartridge out again and clean the chip, or gold contact, with a lint free cloth or Q-tip. Gently wipe the contact with the Q-tip a few times. The chip on an ink cartridge is very sensitive. Sometimes residue can get on the chip and produce an error on your machine.
-
- Next, we are going to want to reset the printer. To do this, power down the machine, unplug the power cord from the wall for 15 seconds. Plug it back in and turn the printer back on. Wait for the printer to initialize and then reinstall your recently cleaned cartridge.
-
- If you clean the chip, install the cartridge again and you are still getting an error message, do not be dismayed! You can easily override the error message by pressing and holding down the Stop/Reset button on the printer for a full 15 seconds. It may say “please wait a while” on your printer’s screen and your printer should go through a startup sequence. Once the startup sequence is complete you should be able to print to your heart’s content!
- After overriding the error message the printer will continue to use the cartridge without stopping due to the ink level being low or empty. You will not be able to tell how much ink is left in your cartridge. However, the cartridge is filled to capacity and you should get the same number of prints as an original!
How to Replace a Canon PIXMA MX922 Cartridge
Another solid offering from Canon’s wireless all-in-one range, this sturdy little workhorse is the perfect home office companion and boasts fine photographic print quality, as well as a decent shelf-life.
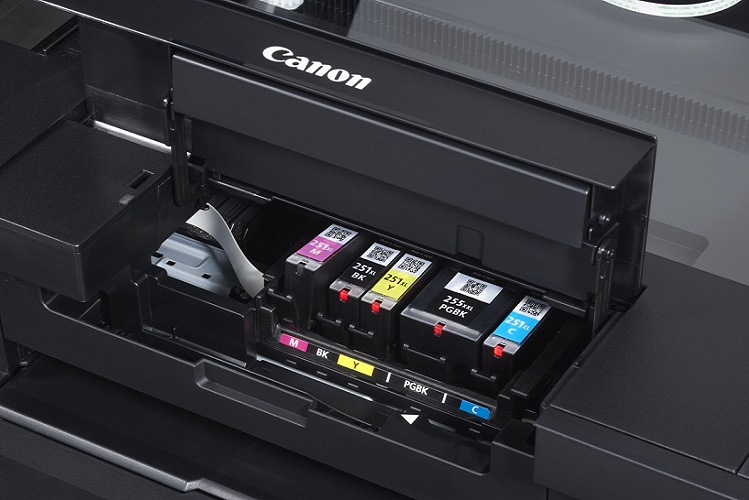
Much like the Epson Expression XP-410 for example, the PIXMA MX922 uses five separate cartridges (two black and three color) which have to be housed in a particular running order (from left to right):
-
- Magenta ink (M)
-
- Black ink (BK)
-
- Yellow ink (Y)
-
- Pigment black (PGBK)
- Cyan ink (C)
Please note, the order can vary from model to model, but every Canon printer of this kind includes color coding beneath the cartridge housing. If in doubt, refer to the codes in bold above.
The Pixma MX922 series offers a high yield and standard yield version of their cartridges. The pigment black is also offered as an extra high yield. High yield cartridges are slightly more expensive but are a better deal in the long term if you print in high volumes. You will need both black cartridges (the pigment black and photo black) in order for your printer to function properly. The pigment black cartridge is designed for printing text while the photo black’s specialty is obviously, photographs.
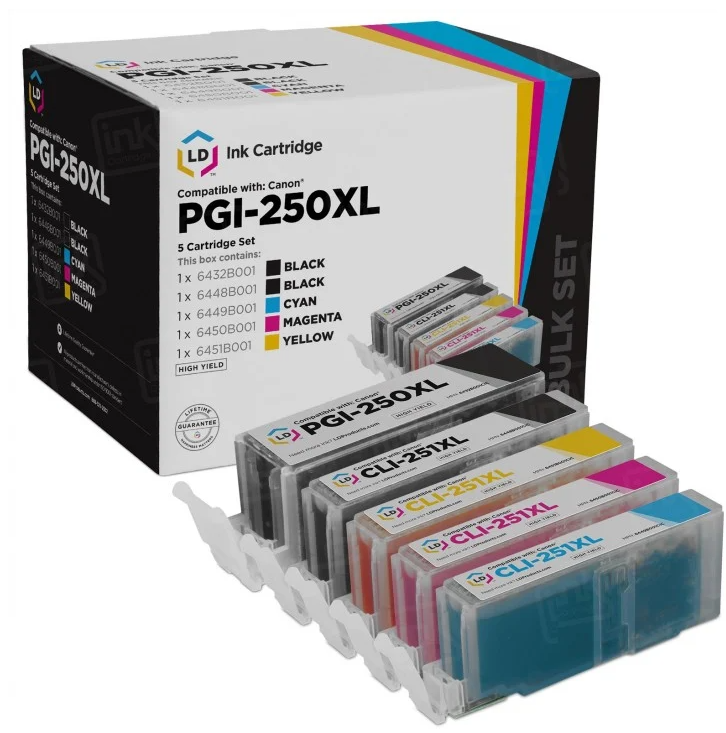
High Yield Cartridges:
PGI-255XXL Ink Extra High-Yield Black (8050B001) / Page Yield: 800
PGI-250XL Ink High-Yield Pigment Black (6432B001) / Page Yield: 500
CLI-251XL Ink High-Yield Photo Black (6448B001) / Page Yield: 4,425
CLI-251XL Ink High-Yield Cyan (6449B001) / Page Yield: 660
CLI-251XL Ink High-Yield Magenta (6450B001) / Page Yield: 660
CLI-251XL Ink High-Yield Yellow (6451B001) / Page Yield: 660
Standard Yield Cartridges:
PGI-250 Ink Standard-Yield Pigment Black (6497B001) / Page Yield: 300
CLI-251 Ink Standard-Yield Black (6513B001) / Page Yield: 1,105
CLI-251 Ink Standard-Yield Cyan (6514B001) / Page Yield: 304
CLI-251 Ink Standard-Yield Magenta (6515B001) / Page Yield: 298
CLI-251 Ink Standard-Yield Yellow (6516B001) / Page Yield: 330
Now that you know a bit more about your ink cartridges, let’s get to it…
#1. Lift the operation panel
To expose the old cartridges, simply lift the operation panel gently with both hands. This is on hinges and lifts up like a lid; raise the panel placing your hands at the join just beneath the LCD screen.
#2. Wait for the ink cartridge housing to slide into place
Make sure you wait for the old cartridges to automatically move to the centre of the printer before touching them. Once they’ve moved to the middle, it’s time for the next step.
#3. Remove the empty cartridges
To remove the empty cartridges, carefully push the tab located at the end of each cartridge insert until they are released from their housing and pull them out. To avoid any confusion or unwanted leakage, make sure you remove each cartridge one by one – slow and steady wins the race.
#4. Remove the packaging of the replacement cartridges and insert them
Any new cartridge might have the tendency to leak upon opening, so before you think about removing any packaging, it’s worth making sure you put down some plastic or newspaper down on a flat, even surface and avoid working near anything delicate or valuable. Some even prefer opening cartridges over a trash can just to be on the safe side.
To expose the nozzles and get the replacement cartridges ready for insertion, make sure you remove the gray outer film, followed by the orange tape and the thicker orange cap on the outer casing. Once you have done so, insert each cartridge into the printer, following the color key below the housing, making sure the labels are facing upwards, then push them down until you hear a click. Once they are in place, a small red light will appear on the cartridge; this lets you know that they are secure. Finally, close the operation panel.
#5. Run an ink test
Once you’ve replaced your Canon printer ink cartridges, you should run a quick print test to make sure everything is working correctly.
To do so, fire up your desktop, pick an image that covers as much of the color spectrum as possible (this will give you a decent gauge of the performance of each cartridge) and press print.
If the ink comes out streaky or smudgy, consult your Canon printer manual to check how to re-align the printheads.
We hope you enjoyed our fool proof guide on how to change the main two types of Canon printer cartridges. If you would like to check out the other guides in the series, please feel free – and if you have any more printer ink related questions, drop us a line – we’ll be happy to help.
Good luck!


cannot regognize cartridge i just bought from u? i tried what was your site to reset n/g